
Create a rainy pedestrian crossing on an imported map
This tutorial follows a common scenario-authoring workflow: import a map, make one controlled change, place road users on it, add environmental context, and export a complete test. The scenario is officially called Rainy intersecting conflict with crossing pedestrian: an ego car approaches while a pedestrian crosses the road in rain.
Learning outcomes: After this example, you can import and safely modify a map, refine map-aware trajectories, configure actor types, dimensions, actions, and an optional controller, add weather and perception gaps, inspect criticality measures, run the quality checker, and choose suitable export formats.
Before you start: Imported maps
scenario.generator opens in Trajectory mode. Importing a map does not change that mode: you can immediately use it as context for trajectories, or select Switch to map mode above the canvas when you want to edit the road network itself.
This tutorial starts from an existing map. To learn how to create and connect roads from scratch, follow Build a simple map and drive it.
Optional shortcut: Open Load scenario, select VRU crossing from left (.json), and choose Load default to load a completed vehicle–pedestrian encounter together with the RITA junction map. The vehicle follows the eastern approach and the pedestrian crosses between its sidewalks. In the bundled default, both actors reach the conflict point at
4.0 s. To create the near-conflict described in this tutorial, first follow step 6 in section 2 and move the pedestrian's conflict time slightly earlier; then continue with section 3 to add rain and a perception gap. The manual steps below deliberately use a simpler straight road so that map adaptation and trajectory placement remain easy to practise.
1. Import and adapt the road
- Open Load map in the light-blue header and select Upload map to open an
ASAM OpenDRIVE
.xodrfile. For this tutorial, download and use tutorial-straight-road.xodr (Download). If you want to practise on a larger road network, select the bundled RITA junction (.xodr) in the same dialog and choose Load default instead. Exact road names, waypoint positions, and screenshots in the manual steps below refer to the simpler tutorial map. - Decide when you want to modify the map:
- To use it unchanged for now, remain in Trajectory mode and continue with section 2. You can return to the map at any later point.
- To modify it now or later, select Switch to map mode above the central canvas whenever you are ready. Merely entering and leaving Map mode does not create an editable copy or change the imported file.
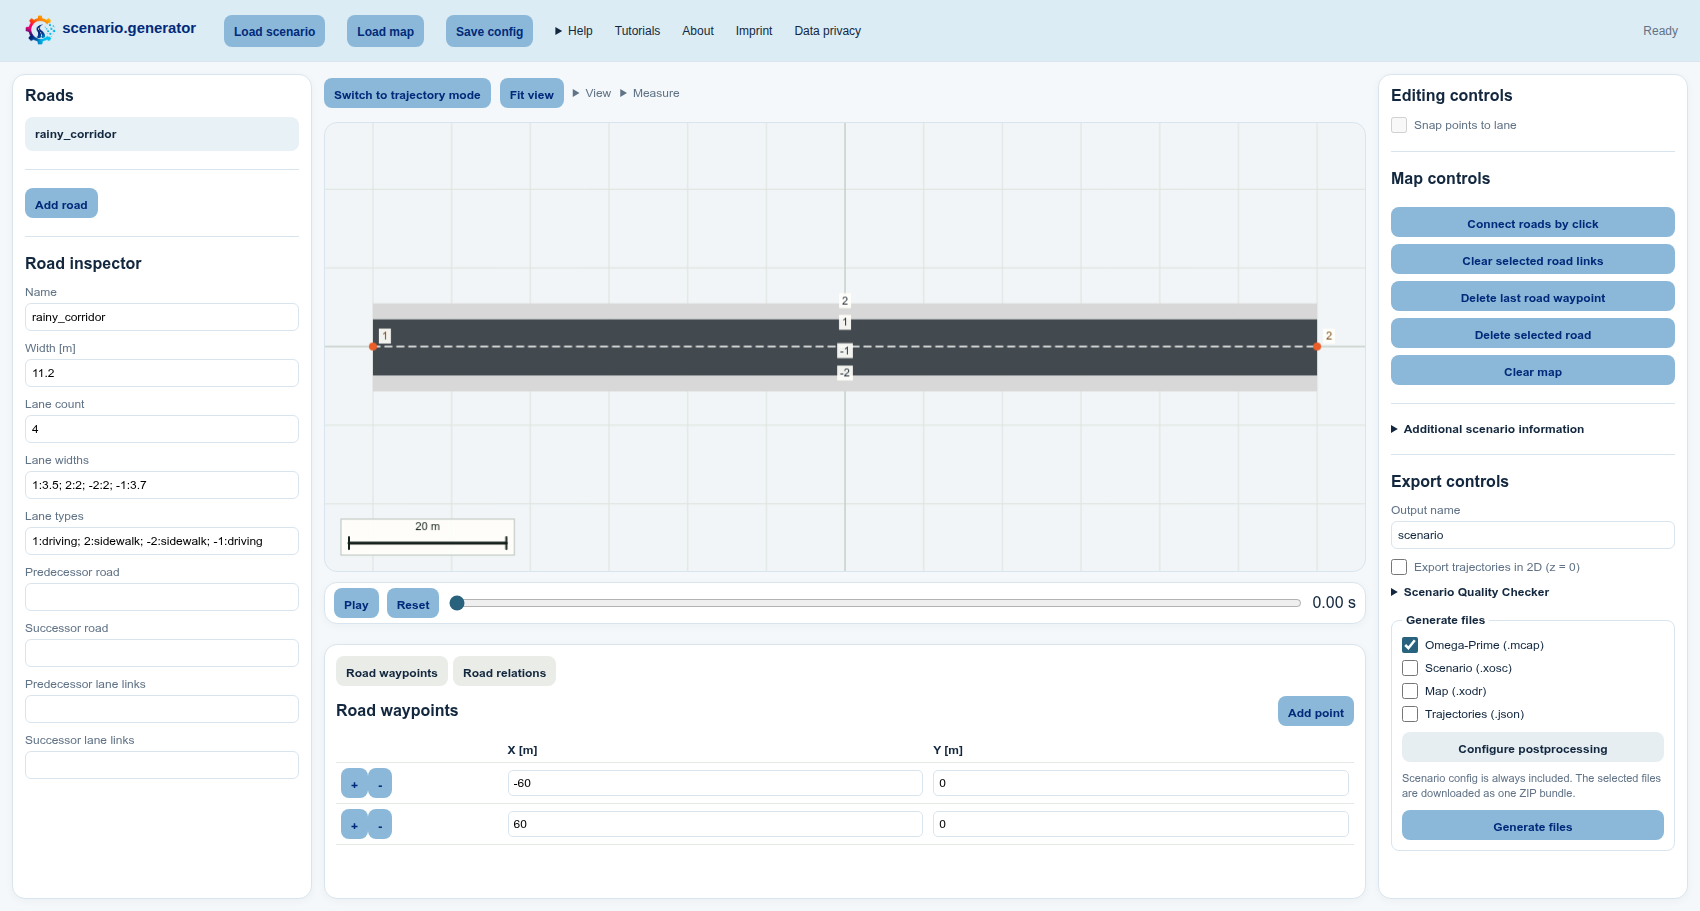
- In Map mode, select the imported road in the Roads list on the left.
Try your first actual change in the Road inspector below the list—for
example, change Name to
rainy_corridor. - The Modify the imported map? dialog appears only when you attempt that first change. Confirm it to create an editable copy; the uploaded source file remains untouched. If you cancel, no change is made. You can return later and the dialog will appear again when you next try to modify the map.
- You can now adjust a lane width, drag a road point on the canvas, add a road, or change a road connection. After the editable copy has been created, further edits no longer require confirmation.
- Open View above the canvas. Under Map view, enable Road points, Lane numbers, and Road centerlines, then select Fit view beside the menu.
2. Stage the rainy intersecting conflict
-
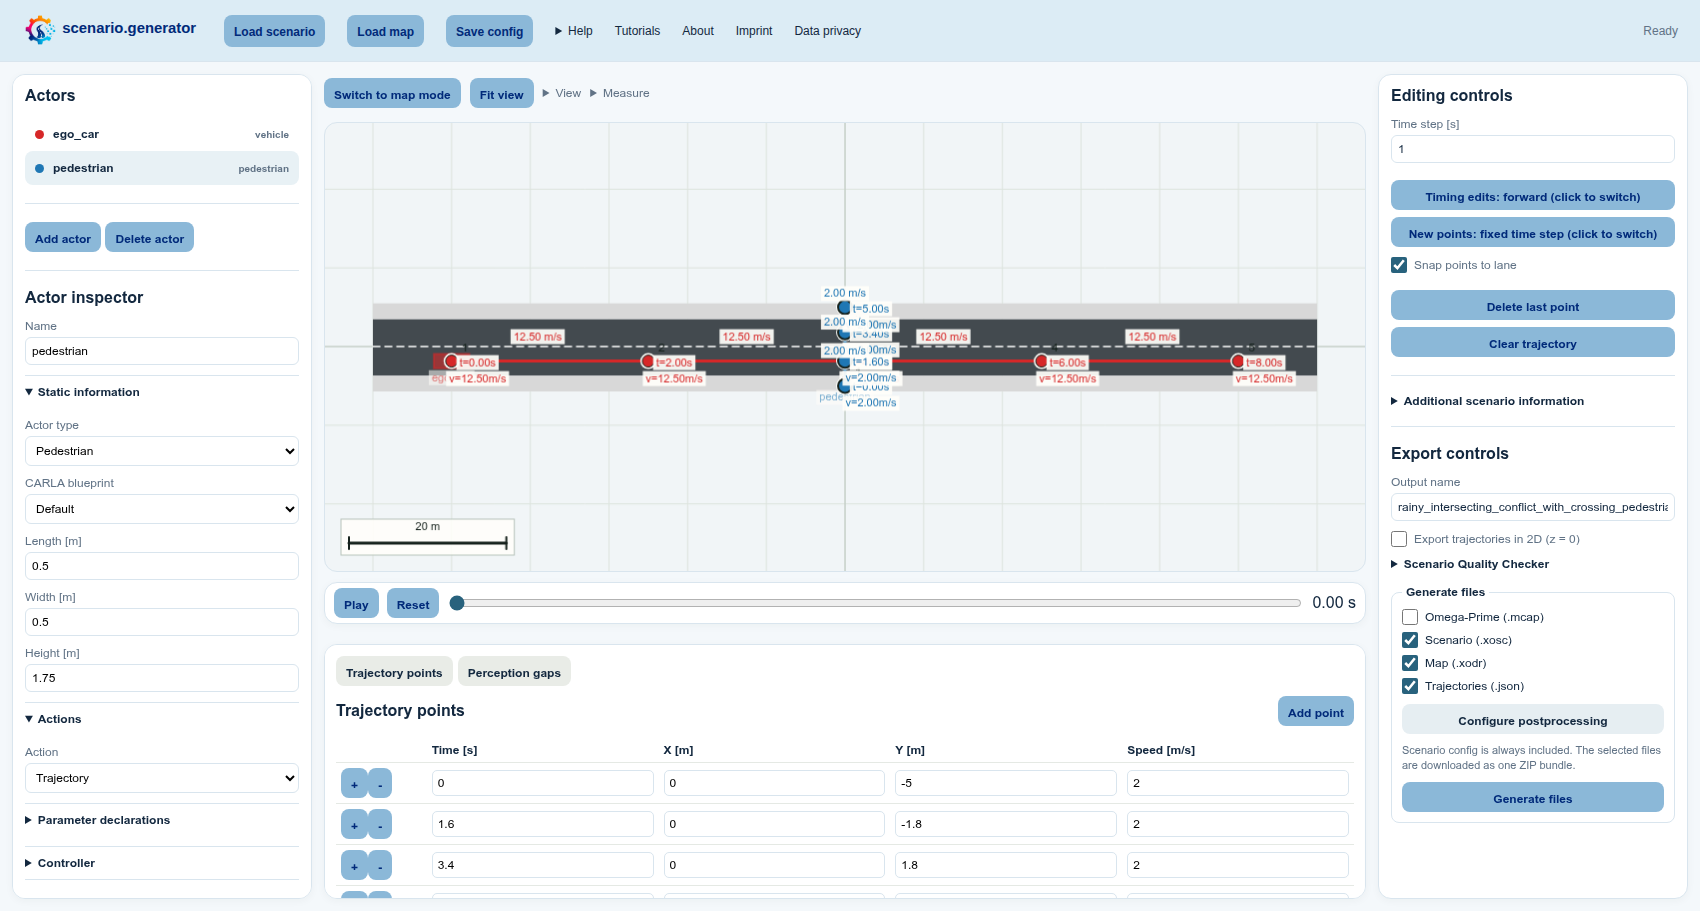
Select Switch to trajectory mode above the canvas. In the Actors list on the left, select
vehicle_1. You can rename it toego_carin the Actor inspector below the list. -
Under Editing controls on the right, enable Snap points to lane. Select Clear trajectory in the same panel and select positions along one driving lane with a pointer or the canvas keyboard cursor and Enter. Alternatively, move the existing points onto that lane or edit their coordinates in the Trajectory points table below the canvas.
-
In the Actors list, select
vehicle_2. You can rename it topedestrian. Under Actor inspector → Static information, set Actor type to Pedestrian. -
To practise changing actor dimensions, keep the pedestrian selected and set Length to
0.5 m, Width to0.5 m, and Height to1.75 min Actor inspector → Static information. These values affect its bounding box in scenario.generator as well as dimensions written to supported export formats.Note — CARLA blueprints: Manually changing these fields does not resize an actor when the scenario is played in CARLA. CARLA determines the physical actor dimensions from the selected blueprint. Choose a matching CARLA blueprint when its in-simulator dimensions matter.
-
Disable Snap points to lane under Editing controls on the right. Clear and redraw the pedestrian trajectory across the road, or move its existing points on the canvas or in the table. Any waypoint shared by both paths can be the intersecting point; it does not need a particular index.
-
At the pedestrian's intersecting point, choose a time that lets the pedestrian pass shortly before the car. Double-click its canvas time label or edit Time [s] in the Trajectory points table. Use Timing edits: forward/backward according to which part of the trajectory should be recalculated.
-
For both actors, keep Action set to Trajectory under Actor inspector → Actions on the left. Their selected and timed paths will then be exported as ASAM OpenSCENARIO XML trajectory actions.
-
Optional controller: Select the actor that should be controlled and expand Controller in the Actor inspector on the left. Enter the controller name expected by your target simulator, then either paste a complete OpenSCENARIO
ControllerorControllerActioninto Controller XML, or use Load controller to import a.json,.xml, or.xosctemplate. The controller is embedded in the XOSC export; scenario.generator does not execute it, so leave these fields empty unless your target runtime supports that controller. For a concrete controller template and all required conventions, see Test OpenADStack in OpenADSim.
3. Add weather and limited perception
-
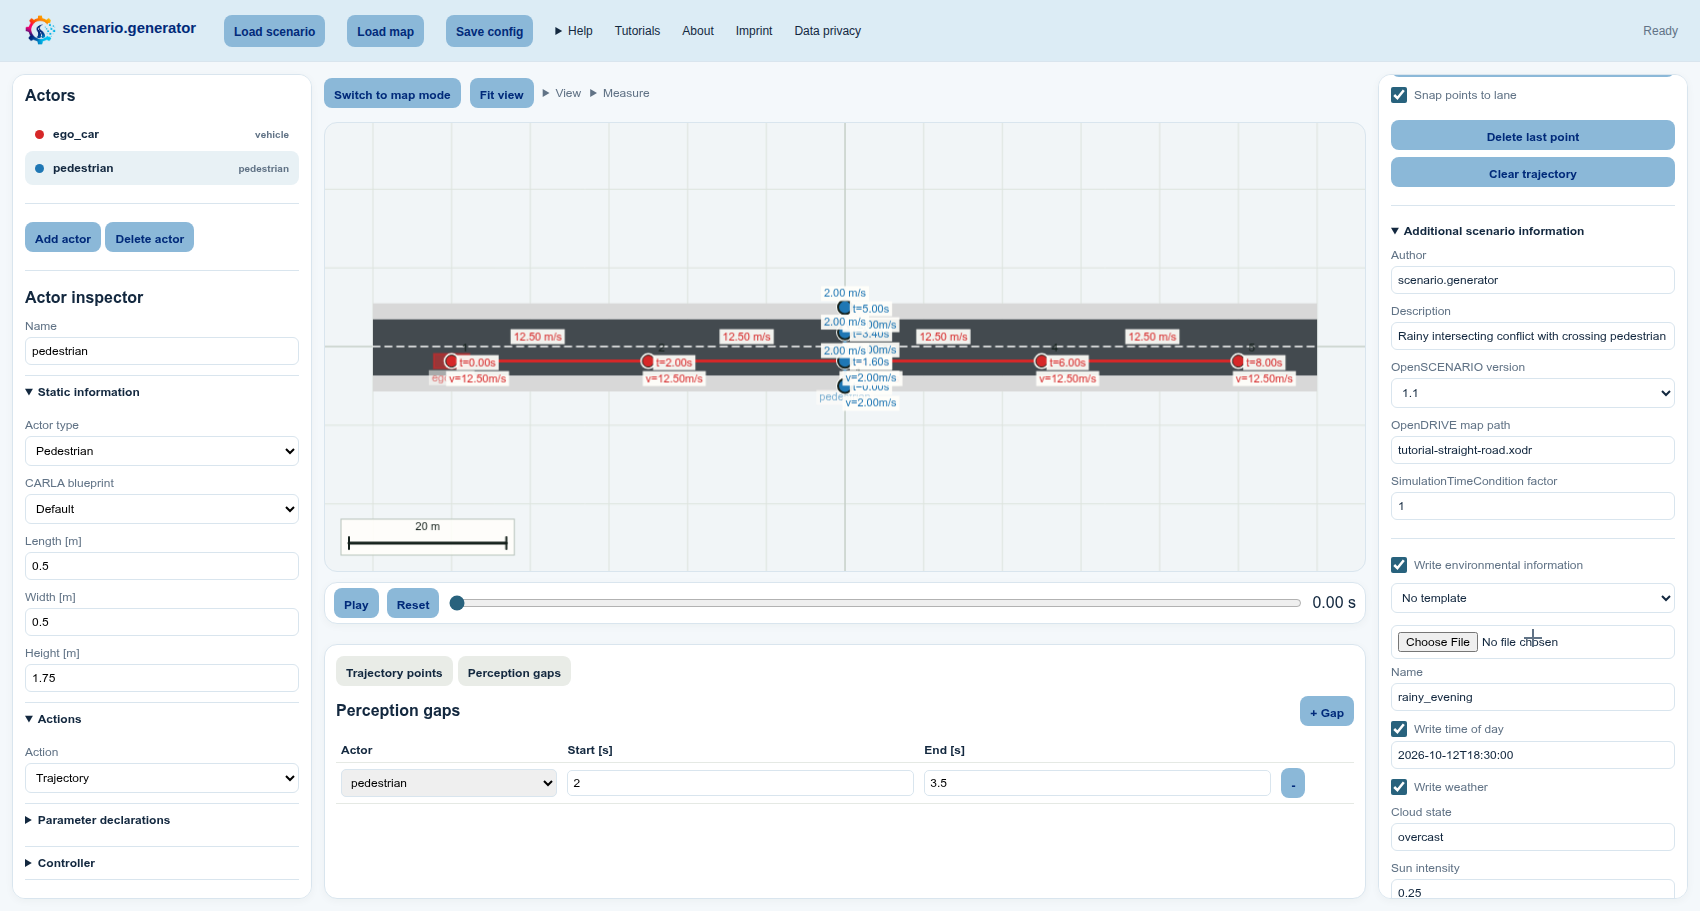
Expand Additional scenario information in the right sidebar below Editing controls.
-
Enable Write environmental information and select the rainy evening template directly below it. Review the time of day, precipitation, visibility, and road-friction fields populated by the template.
-
Open View → Table view above the canvas and enable Perception gaps. In the new Perception gaps tab below the canvas, select + Gap and set the actor to the second actor (
pedestrianif you renamed it), the start time to2.0 s, and the end time to3.5 s.Note — JSON only: A perception gap only changes the
detectedvalues in the Trajectories (.json) export. It is not applied to XOSC, XODR, or Omega-Prime MCAP output. If you do not use the trajectory JSON, the gap has no effect on the generated simulation or exchange files. It is still retained in the editable scenario configuration so you can continue working on it later. -
Select Play in the playback bar below the canvas and inspect the encounter with the time slider. For additional criticality information, open View → Road user view above the canvas and enable TTC min and THW min.
4. Validate, export, and post-process
-
Under Export controls on the right, expand Scenario Quality Checker and select Check scenario quality. Fix actionable problems before exporting; warnings can also document intentional test conditions. The checker is maintained as the external scenario_quality_checker project.
-
Enter any useful Output name, for example
rainy_intersecting_conflict_with_crossing_pedestrian. This only determines the downloaded filenames. -
In Generate files, choose the formats that match your next step:
- Scenario (.xosc) exports the actors, actions, timing, and environment as ASAM OpenSCENARIO XML.
- Map (.xodr) exports the current ASAM OpenDRIVE map, including any adaptations you made. Select it together with XOSC when the map should also be an explicit output; the config's map dependency is included in the portable ZIP automatically.
- Trajectories (.json) is convenient for inspecting the selected actor data or processing it with custom scripts. It is also the only export in which the configured perception gap changes the data.
- Omega-Prime (.mcap) provides a portable traffic-data exchange format. Omega-Prime is compatible with many tools available through the SYNERGIES Marketplace.
Select Scenario (.xosc), Map (.xodr), and Trajectories (.json) to try both the simulation and data-processing workflows in this tutorial.
-
If you selected XOSC, choose Configure postprocessing in the same panel, select
set_stop_simulation_time, and set the stop time to20seconds. -
Select Generate files at the bottom of the right panel. The ZIP always contains the editable scenario configuration and additionally contains every selected format.
You can reuse this workflow for real scenarios by replacing the map and actor positions while keeping the same import → adapt → stage → inspect → validate → export rhythm.