
Test OpenADStack in OpenADSim
OpenADS is an open ecosystem for developing and testing automated-driving systems. It defines OpenADStack, a modular reference system for automated driving, which can be tested in the OpenADSim simulation environment. Such tests require scenarios that describe the road environment, traffic participants, and their behavior.
This tutorial shows how to create an OpenADS-compliant scenario for testing the
reference stack in OpenADSim. It uses a cut-in as an example: OpenADStack drives
ego_vehicle, while OpenADSim and the CARLA scenario runner execute the
surrounding traffic and let you observe how the stack responds to the cut-in
vehicle.
Learning outcomes: After this example, you can prepare a map-aware OpenSCENARIO test for OpenADSim, assign the OpenADStack ego controller, declare the trajectory parameters required for non-ego actors, export the required files, and prepare them for an OpenADSim run.
Before you start: choose a map OpenADSim can use
An OpenADSim simulation always runs on a map, but supplying your own map file is optional: you can also select one of its prebuilt maps. A scenario must refer to the same map that OpenADSim loads.
This tutorial uses OpenADSim's supported synthetic_curve_cut_in example map.
It is a helpful choice because the OpenADSim repository provides both parts
needed for this closed-loop OpenADStack test:
- OpenDRIVE, which CARLA uses for the simulation road network; and
- the matching Lanelet2 map, which OpenADStack uses for map-based route planning.
For an OpenADSim test without OpenADStack, a custom OpenDRIVE map can be enough. When OpenADStack should drive on a custom map, you generally also need a matching Lanelet2 map. The available prebuilt maps and the custom-map settings are listed in the official OpenADSim configuration guide.
1. Create a cut-in test on the supported map
Optional shortcut: Choose Load scenario, select Cut-in from left on curved road (.json), and choose Load default to inspect a completed cut-in whose trajectories and
synthetic_curve_cut_in.xodrmap are loaded together. Continue with the manual steps below when you want to build the scenario yourself.
- Open Load map in the light-blue header and select Upload map to import synthetic_curve_cut_in.xodr (Download). This is a local copy of the map shipped with OpenADSim. If that map is bundled as a default in your deployment, select it and choose Load default instead.
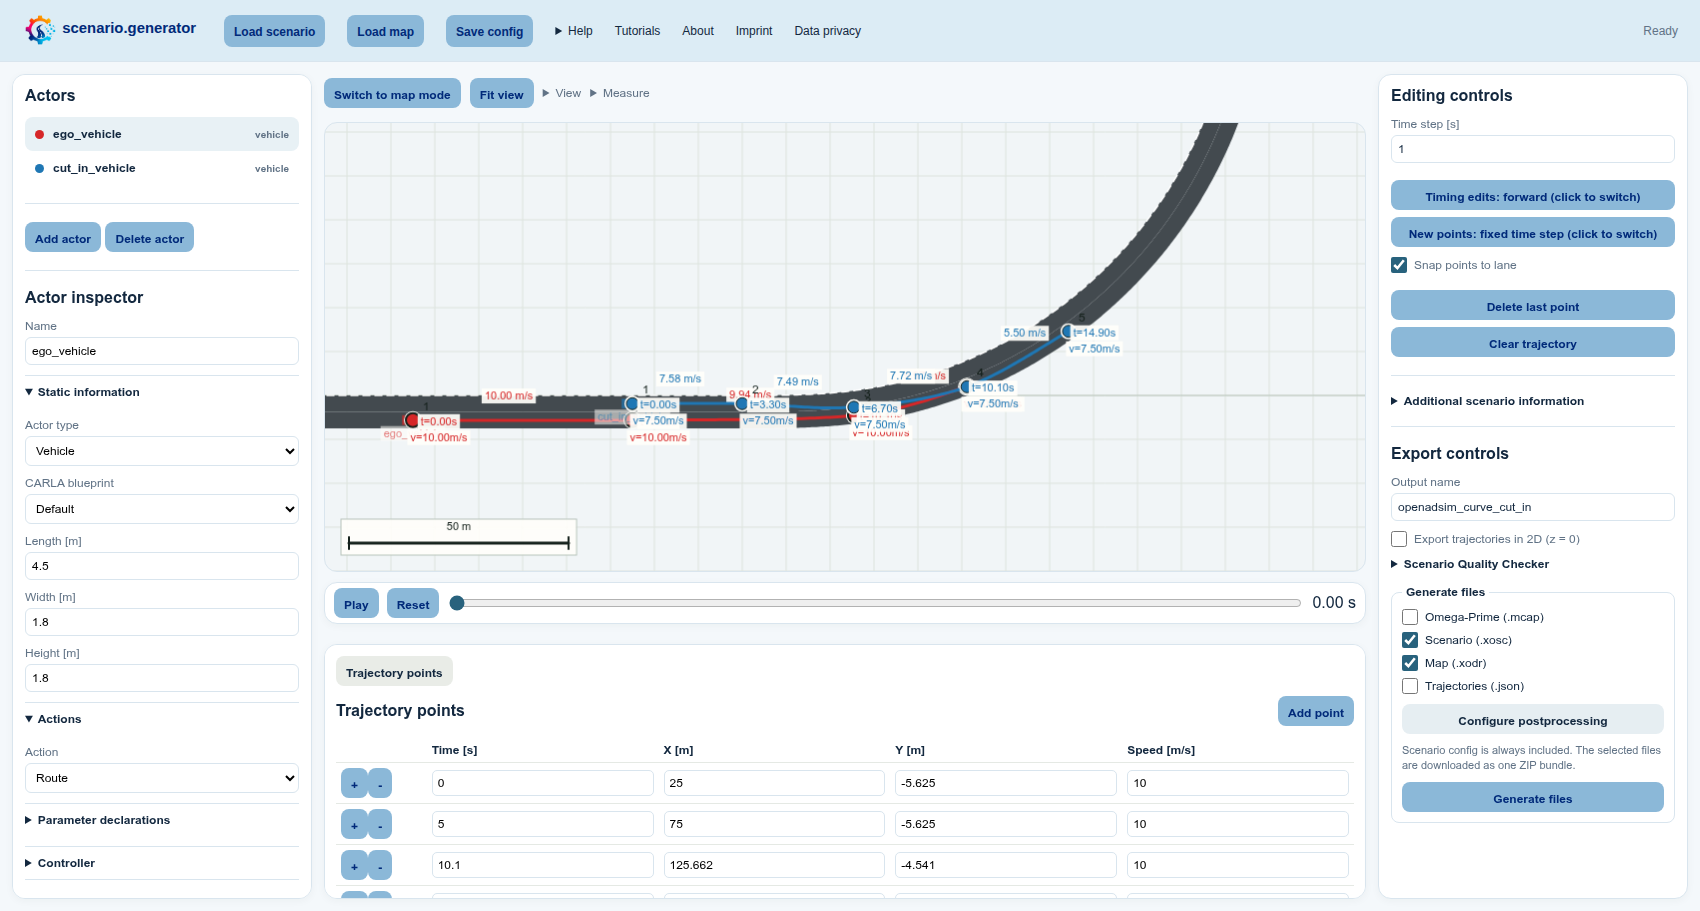
- In the Actors list on the left, select the first actor. In the Actor
inspector below the list, rename it exactly
ego_vehicle. OpenADSim uses this name to identify the vehicle controlled by OpenADStack. - Under Editing controls on the right, enable Snap points to lane and
select Clear trajectory. Select route positions for
ego_vehiclealong the outer driving lane, starting on the straight section and continuing into the bend. Use a pointer or the canvas keyboard cursor and Enter. You can move a misplaced point on the canvas or correct its coordinates in the Trajectory points table below the canvas. - In Actor inspector → Actions on the left, set Action to Route.
The selected points will then be exported as an OpenSCENARIO
AssignRouteActionfor the OpenADStack controller. - Select the second actor and rename it
cut_in_vehicle. Place its trajectory in the neighbouring lane ahead ofego_vehicle, then let it cross the dashed lane marking into the ego lane on the bend. Keep Action set to Trajectory so OpenADSim can reproduce the actor's timed movement. - Double-click the time or speed labels on the canvas, or use the Trajectory points table below it, to make the cut-in happen while the ego vehicle is approaching. The test now has a clear purpose: observe whether OpenADStack reacts safely to the lane change.
2. Assign the OpenADStack ego controller
-
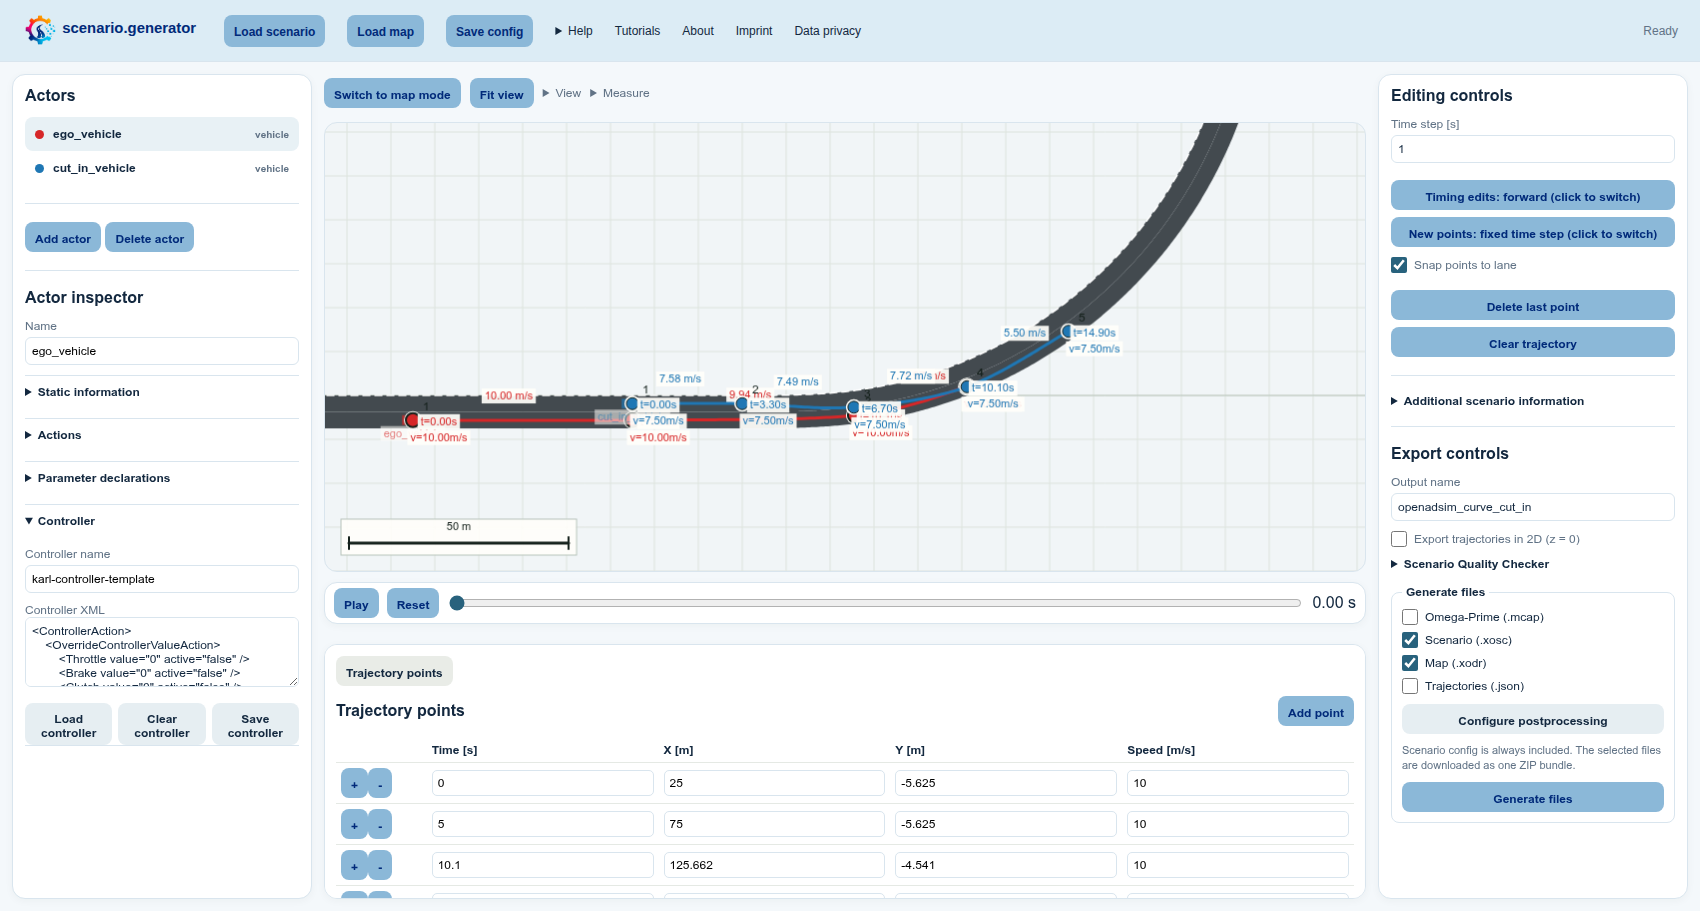
Select
ego_vehiclein the Actors list on the left and expand Controller in the Actor inspector below it. -
The controller template cannot currently be selected from a built-in list. Select karl-controller-template.json (Download), then select Load controller in the Controller section and choose the downloaded file.
-
In Controller XML, verify that the imported XML contains controller
RosRouteControllerand moduleros_vehicle_control_route_action.py. This controller passes the OpenSCENARIO route to OpenADStack while leaving direct vehicle control to the stack.
3. Declare trajectory parameters
Repeat these steps for cut_in_vehicle and every additional actor except
ego_vehicle:
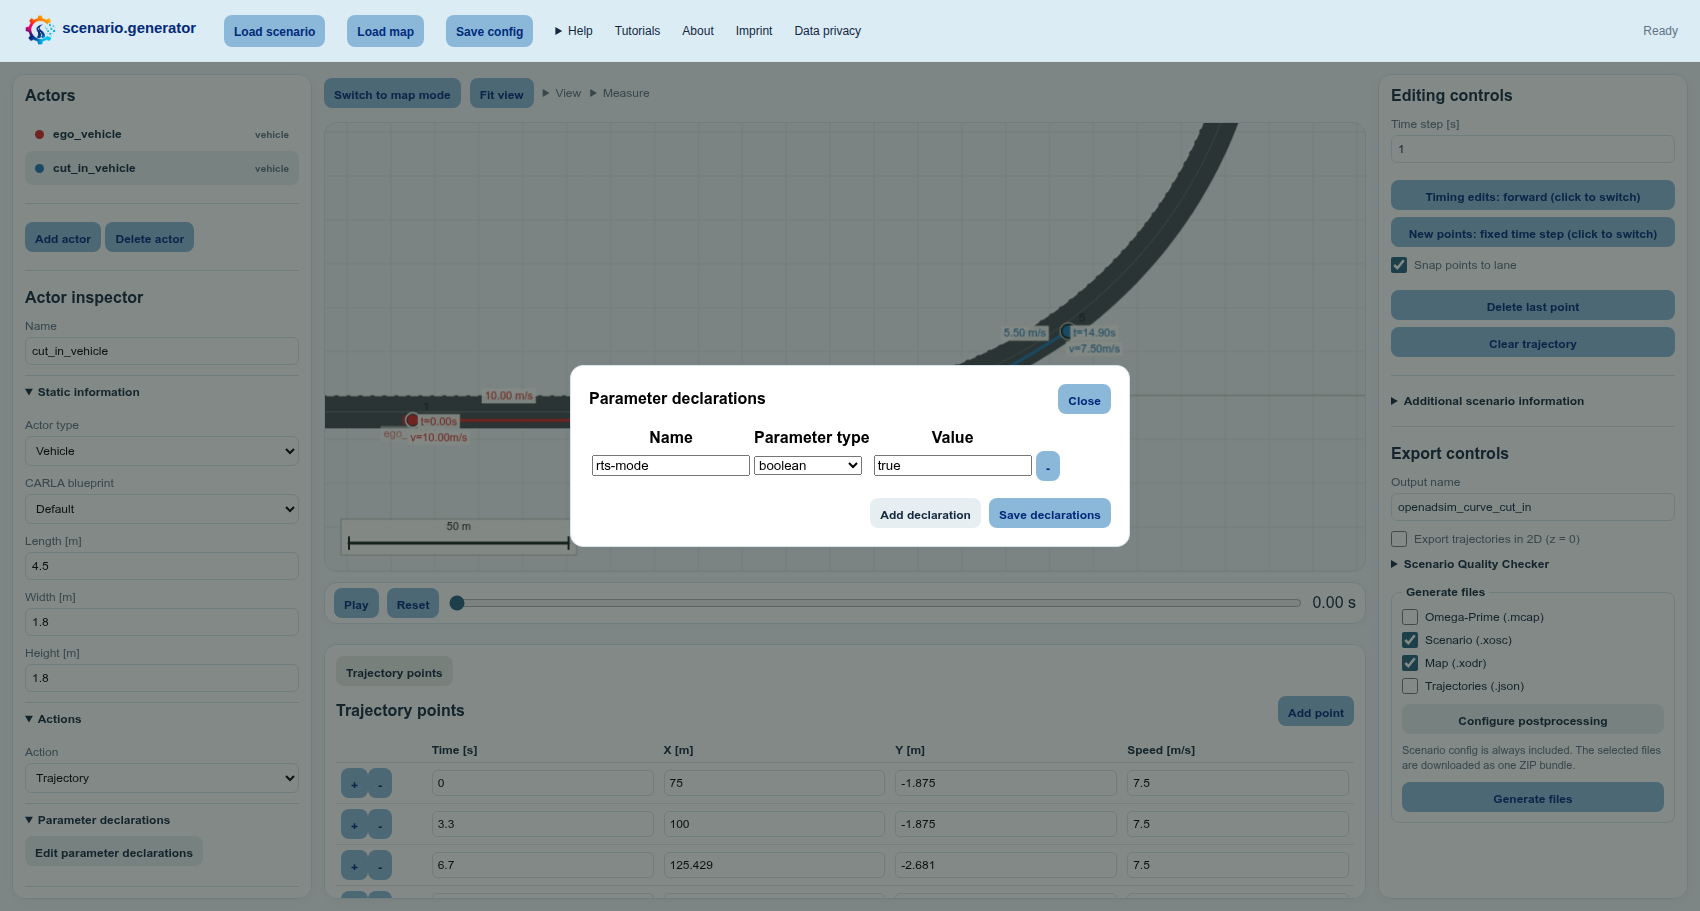
- Select the actor in the Actors list on the left.
- Expand Parameter declarations in the Actor inspector and select Edit parameter declarations.
- In the dialog, select Add declaration and enter name
rts-mode, typeboolean, and valuetrue(BooleanTrue). Then select Save declarations.
Do not add this declaration to ego_vehicle: OpenADStack controls the ego
through its route controller, while rts-mode = true belongs to the
trajectories executed for the other actors.
4. Export and prepare the OpenADSim run
-
Expand Additional scenario information in the Actor inspector on the left. Set OpenDRIVE map path to
synthetic_curve_cut_in.xodr, matching the map filename that OpenADSim will load. -
In Export controls on the right, enter any useful Output name, for example
openadsim_curve_cut_in. This only determines the downloaded filenames. -
Under Generate files, select only the formats needed here:
- Scenario (.xosc) contains the route, controller, timed cut-in trajectory, and trajectory parameters.
- Map (.xodr) contains the custom CARLA road network.
Trajectories (.json) and Omega-Prime (.mcap) can also be exported, but neither format is relevant to OpenADSim scenario execution. Both formats represent route actions as trajectories and are therefore not needed in this example.
-
Select Configure postprocessing in the same panel. Enable
set_stop_simulation_timeand choose a duration that leaves enough time for the cut-in and the stack's response, for example30seconds. Apply the postprocessing configuration. -
Select Generate files at the bottom of the right panel. Keep the exported XOSC and XODR together so the relative map reference resolves.
After export, prepare the files for OpenADSim. The official OpenADSim scenario-execution example provides the corresponding reference workflow:
- Place the XOSC and XODR in an OpenADSim scenario directory and download the
matching
synthetic_curve_cut_in.osm(Download) into the OpenADSim map setup. - In the OpenADSim Configuration GUI, select CARLA with scenario execution,
configure the exported XODR as
CUSTOM_OPENDRIVE, the matching OSM asCUSTOM_LANELET. - Select the exported XOSC as
SCENARIO_FILE. Confirm that itsRoadNetwork/LogicFilestill namessynthetic_curve_cut_in.xodr. - Start the run and observe
ego_vehiclein CARLA or RViz. The CARLA scenario runner controlscut_in_vehicle, while OpenADStack drivesego_vehiclein closed loop.
Before running, check four things:
- the ego actor is named exactly
ego_vehicle; - every non-ego actor, and only those actors, declares Boolean
rts-mode = true; ego_vehiclecontainsRosRouteControllerwithros_vehicle_control_route_action.py; and- XOSC, XODR, and Lanelet2 OSM all describe the same supported map.
The result is an OpenADS example in the concrete sense intended here: OpenADStack is the system under test, and OpenADSim provides its reproducible closed-loop test environment.